Macarons
Mastering Macarons is a hurdle one must jump in order to qualify as a french patisserie chef, even an amateur one. This became very evident to me in my travels around France.
 |
| Macaron Towers in Paris |
Macarons have become so popular, they've overrun the cupcake! Although I was aware of their existence, I never paid them much attention. It wasn't until I tried them that I fell in love! They were everywhere and it was hard to avoid them. My expanding waistline was testament to that!
 | ||
| Falling in Love... |
Macarons are one of those things that evolved over time. The story begins when Catherine de Medici of Italy married King Henri II of France. When she moved to France, she brought her pastry chefs with her (my kind of lady!). Here, the introduction of almond meal based pastries were introduced.
They were turned into biscuits by two Benedictine Nuns who baked them in order to support themselves during the French Revolution.
In 1901, Pierre Desfontaines of cafe Lauree took two of these cookies, filled them with ganache and gave us the macaron as we know it today!
These petit fours (small baked pastries) are one of the hardest things to make! They are very temperamental and have many crucial points where attention must be paid.
 |
| Specialty Macaron bakery in Tours |
When you look at the ingredients, it all looks quite simple... its not. Here's a run down of the ingredients and the complexities pertaining to them:
Almond meal: No dramas here, except its expensive. No wonder they charge over $2.50 a pop for them! I have made it myself without any issues..peeling almonds is no fun after the first 200 grams.
Egg whites: there are many theories relating to how old the egg whites ought to be. I've used both old and new eggs with the same results. When I compared cold versus room temperature whites, those at room temperature produced a better yield.
Caster sugar:I always weigh rather than measure my sugar. Some recipes ask that you add the sugar gradually. I've found it makes no difference. Just dump it in at the start.
Icing sugar: Once again, weigh don't measure.
Tant pour tant
The first thing I do is make the tant pour tant (one for one). This is basically combining the almond meal with the icing sugar. the smoother the mix, the smoother the batter and therefore the surface of the macarons. I achieve smoothness by processing the mix for 2 minutes and then sifting it twice.
Meringue
Using a mixer has made this process so much easier! I start by adding the sugar to the egg whites (at room temperature) and mix them together, starting at a low speed and increasing the speed every two minutes. After 8 minutes of mixing, stiff peaks should form. A good guide is to remove the whisk attachment and place it over your head. Any meringue attached to it should not drip in the slightest. When you get to this stage, add your chosen colouring and mix for a further minute on top speed.
 |
| Meringue |
Macronage
 |
| Testing the batter |
The process of mixing the meringue with the tant pour tant is the most important step. Overmix and the batter becomes too runny, leaving you with flat macarons with no feet (the little edge that forms on the base of the biscuit). Undermix and you end up with rough, poorly formed biscuits
The secret is to mix until the ingredients are just incorporated and any colouring added is even and uniform. A method in which to test if it is ready is to lift some batter out of the mix and let it fall back in the bowl. It should take 30 seconds for the fallen batter to re-incorporate into the rest of the batter.
Piping
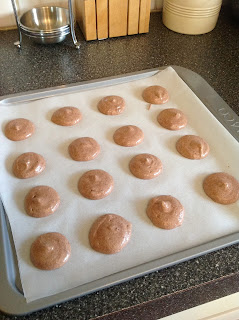
This is a skill that I have improved with each attempt. The aim is to pipe macarons that are uniform in size and shape. One suggestion is to draw a template of circles onto your baking paper. Once you have piped the batter out onto your lined trays, tap them against the bench four or five times really hard. This expels any air bubbles which, if not removed may crack the surface of the biscuits.
 |
| Piping getting better! |
 |
| Piping not so great |
Croutage
The macarons need to be rested after they have been piped. This allows them to dry out, creating a thin film on the surface of the macaron. When cooked, this film becomes crisp and ensures that no cracks form in the surface. I find that 15-30 minutes was ample time for croutage. In order to test whether the film has formed, brush your finger gently across the surface of the macaron. If the batter doesn't stick to your finger, they are ready.
Baking
 |
| Cooling |
Baking times will vary according to your oven. I had to buy an oven thermometer to test my oven out. Turns out it has a hot spot in the upper right hand corner. I compensate for this by
1) whingeing to my husband about the crappy oven and
2) turning the tray 180 degrees halfway through cooking time.
Put them into a preheated oven at 150 degrees Celcius for 20 minutes.
 |
| Perfect underside |
Halfway through the baking time is when the feet at the base should form. Let them cool on the tray and then slowly peel the baking paper away from the biscuit. The base should be smooth and intact. If they are still gooey, they haven't been baked for long enough.
Flavoring
The options are endless. You can add essence to the biscuits right before macronage if wet and if using dry flavourings such as cocoa powder or crushed nuts, add them into the tant pour tant after sifting.
As for the filling, the most popular is ganache. Its smooth and creamy and can be flavoured quite easily by incorporating pureed fruit or essence whilst beating. Butter cream is another option, but I don't like it. Fresh fruit, jam, lemon curd, caramel...the list is endless!
 |
| Strawberries and Cream |
Customisation
There are so many methods in which to make macarons pretty. Crushed nuts can be sprinkled to the top of the macarons before croutage. Chocolate drizzled over the top of filled macrons, edible shimmer powder and star dust brushed onto cooled biscuits are a few other options.
 |
| Customised Blueberry |
So, give them a go. They look so pretty and taste amazing!
Ingredients:
150 g almond meal
230 g icing sugar
140 g egg whites
70 g caster sugar
Bake at 150 degrees C for 20 minutes


.JPG)


.JPG)


